

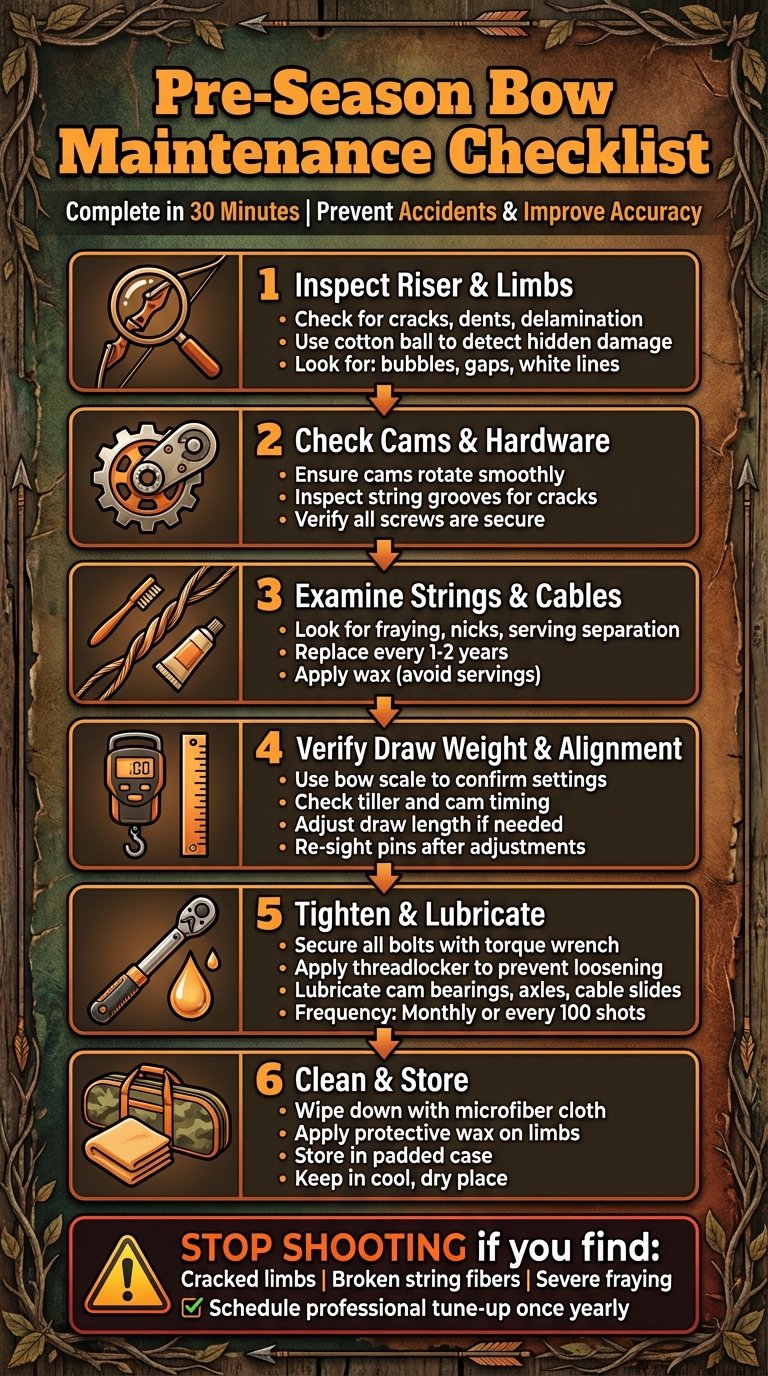
Before you head into the season, checking your bow is a must. A quick inspection can prevent accidents, ensure your gear is reliable, and improve your accuracy. Neglecting maintenance risks string breaks, limb cracks, and misaligned components, which can lead to poor performance - or worse, injuries. Here’s what you should focus on:
- Inspect the riser and limbs: Look for cracks, dents, or delamination. Use a cotton ball to detect hidden damage.
- Check cams and hardware: Ensure cams rotate smoothly and screws are secure.
- Examine strings and cables: Look for fraying, nicks, or serving separation. Replace damaged strings immediately.
- Verify draw weight and alignment: Use a bow scale to confirm settings. Adjust draw length and check tiller and cam timing.
- Tighten and lubricate: Secure all bolts and apply lubrication to moving parts.
- Clean and store: Wipe down your bow and store it in a padded case.
Taking just 30 minutes to follow these steps can save you from costly repairs and missed opportunities. For tools and accessories to simplify maintenance, check out Morr Innovations.
Pre-Season Bow Maintenance Checklist: 6 Essential Steps
Inspect the Riser, Limbs, and Cams
Perform a Visual Inspection
Start with the riser, the core frame of your bow. Carefully feel along the seams, sight window, and attachment points. Look for signs of damage like cracks, dents, deep scratches, or bends that could weaken the structure when the bow is drawn. Even small cracks can lead to dangerous failures under tension.
Next, move to the limbs. Inspect them thoroughly from tip to pocket, checking for splinters, cracks, delamination, or twists. Delamination often appears as bubbles, gaps, or white lines between the layers of laminate, which can result from impacts or exposure to moisture. This is a serious problem, as delaminated limbs lose their strength and could break during use.
Here’s a handy trick: use a cotton ball or soft cloth to check for tiny cracks. If the cotton catches, frays, or leaves fibers behind, take a closer look. Use a bright LED light and examine the bow from different angles to spot any hidden damage.
Once you’re confident the riser and limbs are in good shape, turn your attention to the cams.
Check the Cams for Wear
Cams experience a lot of stress, so they need a detailed inspection. With the bow unloaded, rotate each cam by hand to ensure they spin smoothly without sticking or unusual noises. Any resistance or odd sounds could indicate misalignment or bearing wear, which might lead to cable failure.
Inspect the string grooves and attachment points on the cams for cracks, chipped edges, burrs, or flattened surfaces. Also, check that all screws on the draw modules and draw stops are secure and not missing. Uneven cable wear can signal timing issues that may affect arrow flight. If you spot anything unusual, stop using the bow immediately and have it checked by a professional technician.
Pre-Season Bow Inspection and Tuning
Check Strings, Cables, and Servings
Keeping your bow's strings and cables in excellent condition is essential for accuracy and safety.
Look for Fraying or Damage
Start by inspecting your bow's strings and cables under good lighting. Gently run a clean finger along each one to detect any nicks, flat spots, or uneven thickness. Pay extra attention to high-stress areas like the cams, idler wheels, cable tracks, peep sight, D-loop, nocking point, and where the cables touch the cam or cable guard.
Be on the lookout for fraying, broken fibers, deep nicks, or areas that feel soft when you flex them. If you notice a snapped fiber, a deep cut, or serving separation, stop using the bow and get it inspected by a professional immediately. While light surface fuzzing without cuts or flat spots is typically harmless, deeper nicks or soft, “mushy” sections can pose serious risks.
Next, check the servings - these are the protective wraps at the center, around the cams, and at cable contact points. Look for gaps, loosened wraps, or slipping. If the serving moves when pinched or exposes the underlying fibers, it’s time to have it re-served or replaced. Visible broken strands, deep cuts, or separated servings exposing the main string call for immediate professional attention. Avoid shooting until the issue is addressed.
As a general rule, replace your strings and cables every 1–2 years if you shoot regularly. If you shoot frequently, use high draw weights, or expose your bow to extreme conditions, consider replacing them sooner.
Once you’ve confirmed there’s no damage, it’s time to protect your strings with wax.
Apply String Wax
After ensuring your strings are in good shape, apply wax to protect the exposed fibers. Use a high-quality synthetic wax and apply a light coat to the string fibers, steering clear of the servings. Work the wax in with your fingers or a soft cloth until you achieve a thin, even sheen. Avoid waxing areas like the center serving, cam/cable servings, or D-loop, as wax in these spots can trap grit and cause slippage.
If you’re shooting in hot, dry weather or after being out in the rain or snow, you’ll need to wax your strings more often. In dusty or sandy environments, apply a very thin layer of wax and periodically wipe down your strings and cables to keep abrasive particles from building up. After wet hunts, let your bow dry completely and reapply wax once it’s back to room temperature. For added convenience, keep a small tube of wax in your pack for quick touch-ups when conditions take a turn.
Verify Draw Weight, Length, and Alignment
Once you've inspected your bow's string and cables, the next step is to check its draw weight, draw length, and alignment. These adjustments are crucial for maintaining both accuracy and safety.
Check Draw Weight and Length
To measure your bow's actual draw weight, use a bow scale - either handheld or hanging. Don’t just rely on the weight printed on the limbs, as string and cable stretch over time can alter the draw weight. If adjustments are needed, turn the limb bolts: clockwise to increase weight and counterclockwise to decrease it. Most bows are set between 50–60 pounds, and each full turn typically changes the draw weight by about 2 pounds. Make small adjustments and recheck with the scale to ensure accuracy.
If you adjust the draw weight by more than 3–5 pounds, it’s important to reassess your arrow spine. Lower draw weights often require more flexible arrows, while higher weights demand stiffer ones to maintain safe and consistent flight. Additionally, any change in draw weight can alter your arrow's impact point. Be sure to re-sight your pins at key distances, such as 20, 30, and 40 yards, to ensure precision for hunting scenarios.
Next, confirm your draw length. Have someone mark your arrow at full draw, then measure from the nock throat to the mark and add 1.75 inches to calculate your AMO draw length. Compare this measurement to your cam settings and adjust if necessary. An incorrect draw length can lead to issues: if too long, it may strain your shoulder and cause string slap; if too short, it can compromise your form, speed, and penetration.
Once your draw weight and length are properly set, it’s time to check your bow's alignment and tuning.
Check Alignment and Tuning
Start by performing a tiller check. Measure the distance from the limb bolts to the string on both the top and bottom limbs at the same reference point. These distances should either be equal or match the manufacturer’s recommendations. For hunting bows, it’s common for the top tiller to be slightly longer - about 1/8 to 1/4 inch more than the bottom.
Next, inspect the cam lean. Align an arrow or straight edge along the flat side of the cam. The cam should point straight along the string path without tilting to one side.
For cam timing, place your bow in a draw board or have a partner draw it slowly while you observe the timing marks on the cams. Both cams should reach their stops at the same time, ensuring consistent arrow release. While visual checks for tiller and cam lean can be done at home, cam timing adjustments that require a bow press should be handled by a professional at a U.S. pro shop.
Finally, perform a paper tune. Shoot an arrow through a taut sheet of paper from a distance of 6–8 feet. A clean bullet hole with centered fletching slits indicates proper alignment. If you notice a tail-right tear, it could mean the rest is too far right (for right-handed shooters) or the arrow is too stiff. A tail-left tear might suggest the rest is too far left or the arrow lacks stiffness. Vertical tears often point to issues with the nocking point, rest height, or cam timing. Make small adjustments, such as moving the rest in 1/32-inch increments, and repeat the process until you achieve a clean bullet hole consistently with your hunting arrows.
sbb-itb-c5ff120
Tighten Hardware and Lubricate Components
Once you've fine-tuned and aligned your bow, it’s time to focus on securing the hardware and lubricating the moving parts. These steps are essential to keep your bow functioning smoothly and reliably.
Inspect and Tighten Screws and Bolts
Start by checking all screws and bolts, especially in areas prone to vibration, such as sight mounts, stabilizer bolts, rest attachments, quiver mounts, limb bolts, cam bolts, and module screws. Even the slightest movement in these components can alter your accuracy and shift your point of impact.
Use a torque wrench to tighten each piece of hardware according to the manufacturer’s specifications. For example, Hoyt bows typically require 25–30 in-lbs of torque, while Mathews bows can go up to 40 in-lbs. Be cautious - not tightening enough can cause parts to shift during a shot, while over-tightening could strip threads or damage components. Always refer to your owner’s manual for precise guidelines.
To maintain alignment, mark accessory positions with a silver permanent marker before tightening. Once everything is secure, apply a small drop of threadlocker (like Loctite) to the threads. This helps prevent loosening caused by vibration, reducing the need for adjustments later on. If you've added accessories like quivers or grips from Morr Innovations, double-check their mounting screws and apply threadlocker to ensure they stay secure throughout the season.
Lubricate Moving Parts
Next, apply a light lubricant specifically designed for archery, such as Bow Wax Lube, a Teflon-based dry lube, or Tri-Flow. Stay away from heavy greases, as they can attract dirt and debris.
Focus lubrication on critical moving parts, including cam bearings, axles, limb pivot points, idler wheels, and cable slides. Use the lubricant sparingly and wipe away any excess to prevent it from contaminating strings and cables. If you notice any dry or noisy areas, address them promptly. Regular lubrication reduces friction, minimizes wear on high-stress components, and ensures your bow operates quietly - an important factor in the field. For optimal performance, lubricate these parts monthly during the season or after every 100 shots.
Clean, Store, and Organize Accessories
Clean and Protect Bow Surfaces
Once you’ve tightened the hardware and applied lubrication, it’s time to give your bow a thorough cleaning to keep it in top shape. Use a microfiber cloth to gently wipe down the riser, limbs, cams, and any accessories, removing dust and grime. For tougher spots, diluted isopropyl alcohol works well - just make sure to dry everything completely to avoid rust or weakening of the laminate.
To add an extra layer of protection, apply a light coat of protective wax or silicone lubricant on the limbs and frame. This simple step helps guard against moisture and can significantly reduce the chances of mechanical issues during hunting season. After cleaning, store your bow in a padded case - either a hard-shell or a soft case with foam inserts - to shield it from impacts, temperature extremes, and sunlight. Always keep it in a cool, dry place, steering clear of garages or vehicles where fluctuating temperatures can weaken the bow’s fibers.
Once your bow is clean and safely stored, the next step is to get your tools and accessories organized for hassle-free maintenance.
Organize Tools and Accessories
Having a well-organized toolkit can make pre-season maintenance a breeze. Keep essentials like Allen wrenches, string wax, threadlocker, cleaning cloths, and a torque wrench in clearly labeled compartments. Applying threadlocker or string wax to screws before storing your tools can save you time later. With everything in its place, you’ll be able to complete your pre-season checks in under 30 minutes.
For specialized storage solutions, Morr Innovations offers products tailored for archery enthusiasts. The Ez Caddy ($35.00) keeps all your maintenance tools handy, the Arrow Cradle ($24.99) securely holds arrows during inspections, and the Thread Caddy ($25.00) ensures threads stay neat and tangle-free. As Jeremy Dinsmore from Antler Up Outdoors puts it:
"Regardless of the product you purchase off Morr Innovations, you are getting a clean piece of gear that will help keep your archery gear organized and functional."
Conclusion
Taking care of your bow before the season starts is a habit that pays off in confidence and accuracy. By regularly inspecting your riser, limbs, and cams; checking strings and cables for wear; verifying draw weight and alignment; tightening all hardware; and keeping your gear clean and organized, you can significantly reduce the risk of mechanical failures.
The rewards? Reliable performance when it matters most, smoother shot execution, and the peace of mind that your equipment is ready to perform. Stick to a routine: inspect your bow before every use, clean and store it properly after practice or hunts, wax the strings and lubricate cams monthly, and schedule a professional tune-up once a year. If you notice any cracks or severe fraying, stop shooting immediately and consult a technician. Catching small issues early can save you from bigger headaches down the road.
To protect your investment during the off-season, keep your tools, arrows, and accessories well-organized. If you're looking for a way to simplify your setup, check out Morr Innovations' gear organization solutions (https://morrinnovations.com) to keep everything secure and ready for action.
Now, take the next step: set aside 30 minutes this week to go through your pre-season checklist. Verify every adjustment, and make sure your bow is in top shape for the season ahead.
FAQs
How often should I check and replace my bow strings and cables?
It's a good idea to replace your bow strings and cables every 1 to 3 years, depending on how often you use them and their condition. Regular checks are essential - watch for fraying, serving separation, or a loss of tension. Spotting any of these issues means it's time to replace them to ensure your bow remains safe and performs well.
If you're someone who shoots frequently or competes often, you might need to replace them more regularly. Taking care of your strings by keeping them clean and applying wax when needed can help them last longer.
How can I tell if my bow needs a professional inspection?
If you spot cracks or splinters on the limbs, warping or bending, or frayed strings on your bow, it’s a clear sign that it needs attention. Other warning signs include an uneven draw weight or trouble keeping proper alignment and accuracy.
To ensure your safety and keep your bow in top condition, it’s a good idea to reach out to a professional if you notice any of these problems.
What steps should I take to properly align and tune my bow?
To maintain your bow in top condition, begin by examining the string and limb alignment to confirm everything is straight and balanced. Use a bow square to precisely set the nocking point, then take a test shot to evaluate the arrow's flight. If adjustments are needed, fine-tune the sight and arrow rest to enhance accuracy.
Make it a habit to routinely check the string tension and limb alignment. These regular inspections will keep your bow performing at its best and ensure it's always ready when you need it.